Pastel de Nata.
Lisbon Custard Tart
Pastel de nata · say it: pahsh-TEL deh NAH-tah
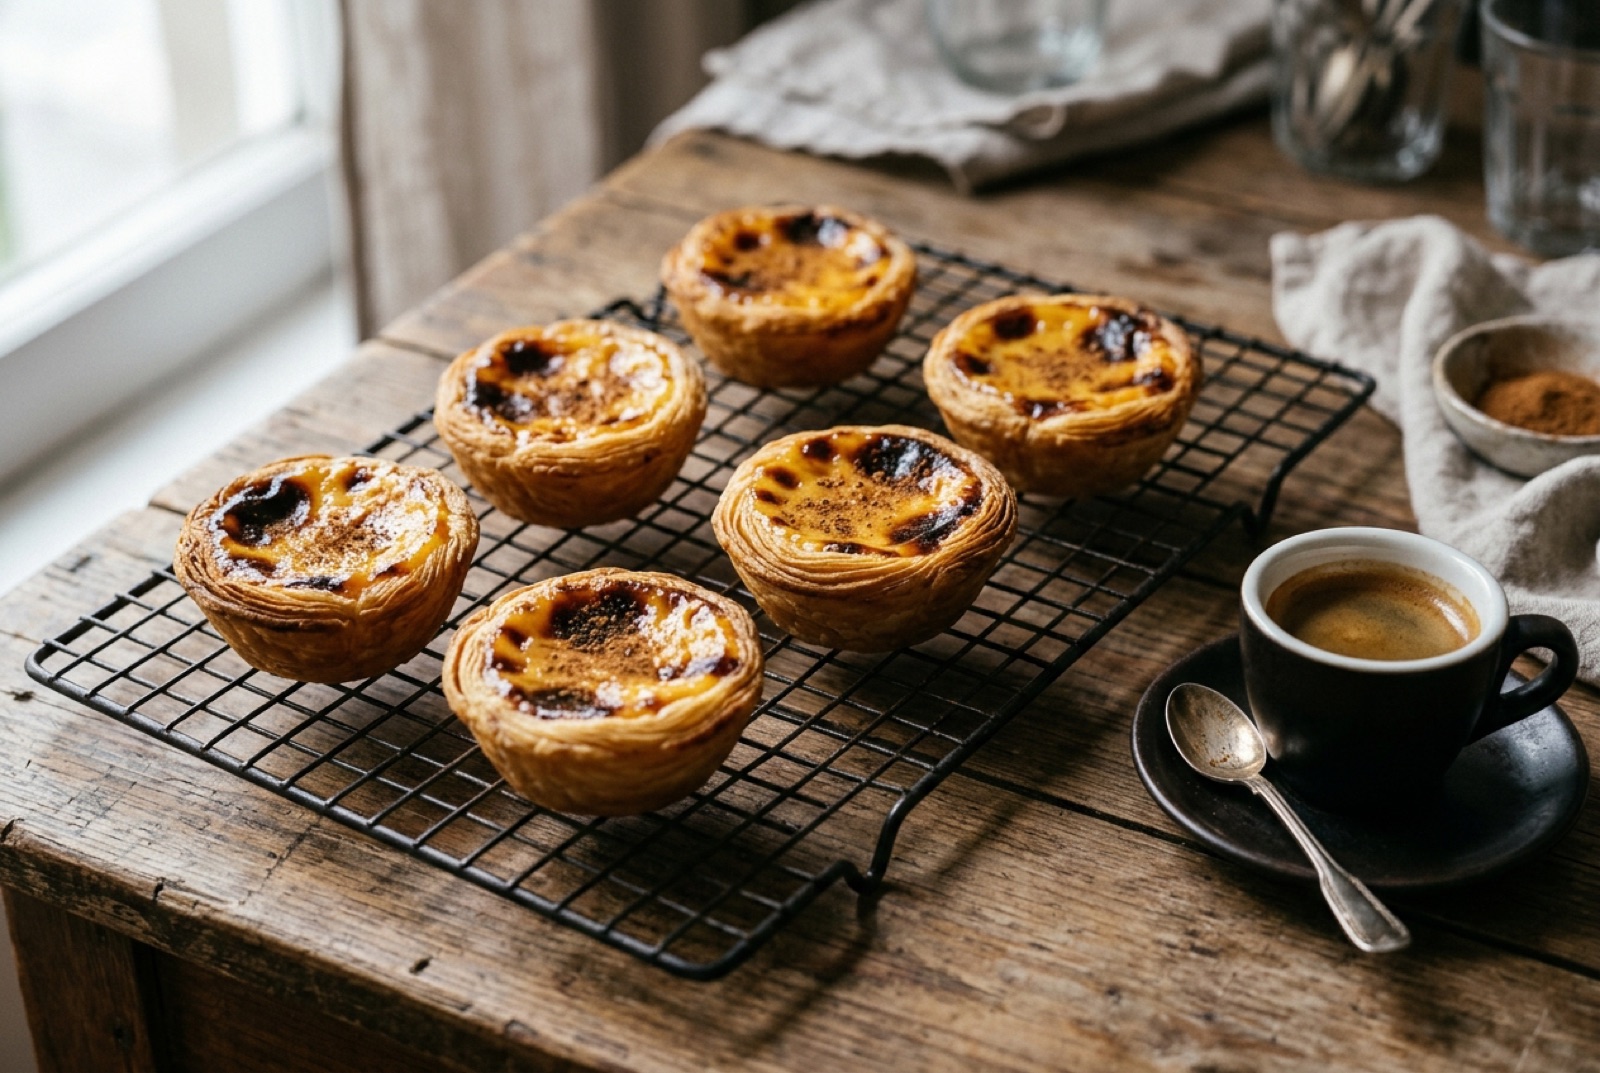
A pastel de nata is a small tart with two extremes held against each other: a shell of laminated pastry so thin and dry it shatters when you bite it, and a filling of egg-yolk custard so loose it barely sets, scented with lemon peel and cinnamon rather than vanilla. The top is not smooth. It should be freckled and scorched with black-brown blisters, which come from an oven hot enough to caramelise the custard surface before the inside has time to cook through. Eaten warm, with a dusting of cinnamon, it is one of the very few famous pastries that genuinely does live up to its reputation — and one that punishes a lukewarm oven more than almost anything else you can bake.

- Gate
- PortugalLisbon
- Prep
- 1 hr
- Cook
- 15 min
- Total time
- 4 hr 15 min incl. 3 hr rest
- Serves
- 12
- Status
- Takes skill
- Nutrition / serving · estimated
- Calories 305 kcal
- Protein 5 g
- Carbs 39 g
- Fat 15 g
- Fiber 1 g
- Sugar 26 g
Why this recipe works.
- Uses the real Portuguese lamination method — butter smeared, dough rolled into a log, discs pressed out by thumb — not a puff pastry shortcut pretending to be one.
- The custard is built on a hot sugar syrup poured into a milk-and-flour paste, which is what keeps it loose and glossy instead of setting like a quiche.
- Explicit about oven heat: what to do when your oven only reaches 250°C, and how to fake the blistering top anyway.
- Tells you what a correctly baked tart looks like, including the fact that black spots are the goal rather than a mistake.
Ingredients.
12 itemsFor the pastry
For the custard
To serve
Equipment
- 12-hole metal muffin tin or pastel de nata tins
- Rolling pin
- Heavy baking steel or tray
- Small saucepan
- Sugar thermometer
- Fine sieve
Instructions.
Make the water dough
Mix the flour and salt, add the cold water, and bring together into a soft, slightly sticky dough. Knead for 3 minutes only, until smooth, then wrap and rest at room temperature for 20 minutes. It should feel relaxed and stretchy, not springy.
First butter smear
Roll the dough on a floured surface into a rectangle roughly 40 x 30 cm and as thin as you can manage. Spread a third of the soft butter over the middle and right thirds with a palette knife, then fold in three like a letter, unbuttered flap first. Chill for 20 minutes.
Tip The butter should spread like thick paint. If it drags and tears the dough, warm it slightly; if it slides around, chill it.
Second and third smears
Repeat twice more: roll out to the same size with the open edge to your right, spread another third of the butter, fold in three, chill 20 minutes between each turn. After the third turn the dough should show faint streaks of butter through the surface.
Roll into the log
Roll the dough one last time into a long rectangle about 40 x 20 cm, then roll it up tightly from the long edge into a firm log the thickness of a large sausage. Wrap and refrigerate for at least 1 hour, or overnight.
Tip Squeeze out air as you roll. Gaps in the log become holes in the finished shell.
Cook the milk paste
Whisk the 40 g of flour with 100 ml of the milk until completely smooth. Heat the rest of 500 ml of milk with the cinnamon stick and lemon peel until steaming, then whisk in the flour slurry and cook for 2 minutes until it thickens to a loose béchamel. Remove from the heat.
Boil the syrup and combine
Bring the sugar and water to a boil without stirring and cook to 100–103°C, about 3 minutes, until it is clear and just syrupy. Pour it into the hot milk paste in a steady stream, whisking constantly, then leave to cool to lukewarm before fishing out the cinnamon and lemon peel.
Tip Pour the syrup hot into the paste, not the reverse. Adding cold liquid to hot syrup makes it seize.
Finish the custard
Whisk the egg yolks into the cooled mixture until smooth, then pass the whole thing through a fine sieve into a jug. It should be thin enough to pour freely and coat the back of a spoon in the barest film.
Tip If it is thick like custard, the yolks went in too warm. Sieve it and carry on — it will still bake, just a little denser.
Shape the shells
Heat the oven to its maximum, at least 250°C, with a heavy steel or tray on the top shelf for 45 minutes. Slice the chilled log into 12 discs about 1.5 cm thick. Put each cut-side down in an ungreased tin and press outward with wet thumbs, from the base up the walls, until the pastry is thin and stands 2–3 mm above the rim.
Tip You are aiming for a shell noticeably thinner at the sides than at the base. Thick walls never crisp.
Fill and bake hard
Pour the custard into the shells to three-quarters full and slide the tin straight onto the preheated steel. Bake for 11–14 minutes, until the pastry is deep golden, the custard has puffed and domed, and the top carries dark caramelised blisters. Finish under the grill for 60–90 seconds if the spots are shy.
Tip Black-brown patches are correct, not burnt. A uniformly pale yellow top means the tart is underbaked.
Turn out and eat warm
Let the tarts settle in the tin for 3 minutes — the custard collapses back into itself — then lift them out with a small palette knife onto a rack. Dust with cinnamon and icing sugar and eat while still warm enough to steam when you break one open.
Tips from our kitchen.
- Your oven temperature is the whole recipe. Preheat for a full 45 minutes with a heavy steel or baking tray on the top shelf, and bake the tins directly on it.
- The custard is meant to be thin — about the consistency of single cream. If it pours like a batter you have overcooked it, and the tarts will bake dense.
- Fill the shells only three-quarters full. The custard rises and puffs dramatically, then falls back as it cools.
- Keep the butter for lamination soft enough to spread with a palette knife but not melting. Cold butter tears the dough; melted butter soaks into it and you lose the layers.
- Press the pastry discs out with wet thumbs, working from the centre up the walls, and leave the rim standing 2–3 mm proud of the tin — it shrinks as it bakes.
- If the tops refuse to blister, switch to the top grill element for the last 90 seconds and watch them continuously. They go from freckled to ruined in about 30 seconds.
Substitutions.
- Home-laminated pastry → 500 g all-butter puff pastry, rolled thin and re-rolled into a tight log before slicing
- This gets you closer than pressing flat discs into the tins, because it recreates the spiral. The layers are less fine and the shell a little heavier, but it is a genuinely respectable shortcut.
- Cinnamon stick and lemon peel → A vanilla pod split lengthways
- This is what most non-Portuguese custard tarts use, and it makes a pleasant pastry — but it stops tasting Portuguese. Cinnamon and lemon are the signature.
- Whole milk → 400 ml whole milk plus 100 ml single cream
- Richer and more forgiving if your oven runs cool, since the extra fat slows the set. Belém-style tarts are made with milk, not cream, despite the name.
Variations.
- Pastel de feijão
- A Torres Vedras speciality using sweetened white bean purée with almonds in place of the custard. Same pastry principle, entirely different filling, and far less known outside Portugal.
- Orange and cinnamon
- Infuse the syrup with a wide strip of orange peel alongside the lemon. Common in Portuguese home kitchens and slightly rounder in flavour than the classic.
- Large tin version
- The same custard and pastry baked as one 24 cm tart. It will not blister the same way — there is more custard mass to heat — so bake at 220°C for 30 minutes and finish under the grill.
Storage & reheating.
These are a same-day pastry, and there is no getting around it. Within four hours of baking the shell is still crisp; by the next morning it has drawn moisture from the custard and gone soft. Keep them at room temperature under a cloth, never in the fridge, which kills the pastry outright. To revive day-old tarts, bake at 200°C for 5 minutes and eat immediately. Unbaked pastry discs freeze well for 2 months, and the custard keeps 2 days refrigerated with cling film on the surface — so you can split the work rather than store the result.
Serve with
A bica (Portuguese espresso), and sachets of ground cinnamon and icing sugar shaken over the top at the table.
The story behind Pastel de Nata.
The tarts come from Belém, the riverside parish west of central Lisbon, and specifically from the Jerónimos Monastery. The commonly told account, repeated by the shop that still makes them, is that the monks used large quantities of egg white to starch their habits and were left with yolks, which they turned into sweets — a pattern that genuinely runs through Portuguese conventual baking, where dozens of yolk-heavy desserts share the same origin story. After the liberal revolution closed the monasteries in the 1830s, the recipe passed to a nearby sugar refinery, and the shop that grew out of it, Pastéis de Belém, has been selling them since 1837. It still guards the recipe closely, and by long-standing convention only that shop calls its tarts pastéis de Belém; everyone else in Portugal sells pastéis de nata.
That distinction matters less than the technique, which is shared everywhere and is unusual in European baking. The pastry is not classic puff with a butter block folded into a dough; it is a lean water dough rolled out and smeared with softened butter, rolled into a tight log, and sliced into discs. Each disc is pressed out with the thumbs directly in the tin, so the spiral of layers ends up running around the walls rather than lying flat. That is why the sides of a good pastel shatter into visible leaves while the base stays firm enough to hold hot custard.
The other half of the secret is heat. Commercial ovens for these tarts run far hotter than any domestic oven, well past 300°C, and the whole bake is over in under ten minutes. The custard sets from the top down, blistering and blackening in patches while staying loose in the middle — which is exactly what you want, and exactly what a 200°C oven cannot produce. In Lisbon the tarts come out in continuous batches all day and are eaten within minutes, standing at the counter, with sachets of cinnamon and icing sugar to shake over the top. A pastel de nata that has been sitting in a display case since morning is a different and much sadder object.
Questions, answered.
Why are the tops of my tarts pale instead of blistered and black?
Your oven is not hot enough. Commercial pastel de nata ovens run above 300°C, and the blistering comes from the custard surface caramelising fast while the inside is still setting. Preheat a domestic oven to its maximum for at least 45 minutes with a heavy steel or tray on the top shelf, bake directly on that, and finish with 60 to 90 seconds under the top grill if the spots have not appeared.
Is a pastel de nata the same as a pastel de Belém?
They are the same kind of tart, but the name pastel de Belém belongs by long-standing convention to the single shop in Belém that inherited the monastery recipe in the 1830s. Everywhere else in Portugal and abroad, they are called pastéis de nata. Whether the Belém original tastes meaningfully different from a good bakery version is one of Lisbon's permanent arguments.
My custard set firm and rubbery — what went wrong?
Either the custard was overcooked on the stove before it went into the shells, or the tarts baked too long at too low a temperature. The filling should go into the pastry as a thin, pourable cream and finish cooking in the oven in under fifteen minutes. A long, moderate bake drives the eggs past the point of softness and gives you a texture closer to a set flan.
Can I use ready-made puff pastry?
Yes, and it is the substitution worth making if you are short on time. Use all-butter puff, roll it thinner than it comes, then roll it up into a tight log and cut discs from that so the layers spiral around the walls of the tin. Simply pressing flat rounds of puff pastry into the tins gives a shell that puffs upward and pushes the custard out.
Do I need special pastel de nata tins?
The traditional tins are small, straight-sided and heavier than standard muffin tins, which helps the base cook through. A metal muffin tray works — use it ungreased, since the butter in the pastry is enough, and expect slightly taller tarts. Avoid silicone moulds entirely; they insulate the base and it stays raw.
What do I do with six leftover egg whites?
The same problem the monks had. Meringues, financiers, an egg-white omelette, or Portuguese suspiros — small baked meringue drops — are the usual answers. Whites freeze perfectly in an ice cube tray for up to six months and whip just as well after thawing, so there is no need to use them immediately.
You might also like.
All recipes →

Keep exploring Portugal.
Portugal has 9 more dishes in the atlas — Arroz de Marisco and Bacalhau à Brás, and 7 more.
Recipe by The DishRoute Kitchen · published August 19, 2026 · updated August 19, 2026